NOTE: This is not a review of a product. Its just some notes and/or comments I have after using it.
A few months ago, I acquired a Canon 1D X. I’ve used the “pro series” bodies for a number of years previously, including both the 1Ds and 1Ds Mark II. My reasons for upgrading were 2, first, ISO, and second, framerate. The majority of the features for the 1Ds and Mark II were quite sufficient for what I did. Color was great, resolution size wasn’t an issue (I don’t do a lot of printing). I was shooting a fair bit of bellydance, and the lighting is/was always low at best. The ISO 1250 of the 1Ds or 3200 of the Mark II just wasn’t enough to give me any room to work. Even f/2.8 frequently wasn’t fast enough. Now I’m also shooting kids sports, and the 3fps of the Mark II means I have to work a lot more for keepers.
Features
There is lots of documentation on the specifications of this camera, so I won’t be dwelling on them. Instead, I’d like to concentrate on how to set up the camera (how I setup the camera, you may or may not wish to use the same settings). The key features of the 1D X can be summarised as follows:
- 18 megapixel full-frame (36mm x 24mm) CMOS sensor
- Max resolution 5184x3456
- Dual Digic 5+ Imaging processors
- ISO 50-204,800
- 14 bit analog to digital conversion
- Up to 12 frames per second (14 frames in JPEG mode with the mirror locked up)
- 61 Point High Density Reticular AF system with AF configuration tool and EOS iTR AF setting (ability to use color for focusing)
- Two (2) Compact Flash Card slots
- Multiple exposures in continuous shooting priority
- 3.2" LCD with approx. 1.04 million dots
- 31 Custom functions including the ability to customize 11 buttons for a choice of 35 settings
- Ability to register 3 custom shooting modes
My typical settings
Saying typical settings is a little silly. I have 3 custom shooting modes that I switch between, depending on what I’m trying to photograph. Some of my commonly used settings are as follows:
| Shooting functions | |
|---|---|
| Shooting Mode | Av |
| ISO | Auto (limited to 25,600) |
| AF Mode | One-shot |
| AF Area Selection Mode | Single Point |
| AF Point | Center |
| Metering Mode | Evaluative |
| Drive Mode | Single Shot |
These settings can be changed, together with some of the custom functions and then registered as a Custom Shooting mode. As mentioned, I have three custom shooting modes set up – Portrait (as above), Sports (used for sports, dance, and other things where subjects move in potentially arbitrary vectors), and landscape (details later).
Shooting (Red)
#1
| Menu Item | Value |
|---|---|
| White Balance | AWB |
| Set Custom WB | |
| WB Shift/Bkt. | 0,0/ ± 0 |
| Color Space | sRGB |
| Picture Style | Faithful |
| Lens aberration correction |
- Peripheral Illumination | Enable
- Chromatic aberration | Enable Multiple exposure | Disable
#2
Jpeg Quality
| Menu Item | Value |
|---|---|
| Image type/size | RAW |
| ISO Speed Settings |
- ISO Speed | 100
- ISO Speed Range | 50-204,800
- Auto ISO Range | 100-25,600
- Min. shutter speed | Auto Auto Light Optimizer | Standard Long Exposure noise reduction | OFF High ISO NR | OFF Highlight Tone Priority | OFF
#3
| Menu Item | Value |
|---|---|
| Image Review | 2 sec. |
| Beep | Enable |
| Release shutter without card | OFF |
| Mirror Lock-up | OFF |
| Dust Delete Data | |
| External Speedlite control |
#4
| Menu Item | Value |
|---|---|
| Live View Set | Stills |
| AF Mode | Live Mode |
| Grid Display | 3x3+diag |
| Expo Simulation | Enable |
| Silent LV Shoot | Mode 1 |
| Metering Timer | 16 sec. |
AF (Purple)
#1
| Menu Item | Value |
|---|---|
| AI Servo Characteristics | Case 1 |
#2
| Menu Item | Value |
|---|---|
| AI Servo 1st Image Priority | Equal |
| AI Servo 2nd Image Priority | Equal |
#3
| Menu Item | Value |
|---|---|
| USM lens electronic MF | ON |
| AF-Assist beam firing | ON |
| One-Shot AF Release priority | Focus |
#4
| Menu Item | Value |
|---|---|
| Auto AF pt. selection,:EOSiTR AF | ON |
| Lens Drive when AF Impossible | OFF |
| Selectable Autofocus point | 61 points |
| Select AF area selection mode | ALL |
| AF Area Selection Method | M-Fn |
| Orientation linked AF point | separate for H/V |
| Initial AF pt, AI Servo AF | Manual |
#5
| Menu Item | Value |
|---|---|
| Manual AF point selection pattern | Stops at edges |
| AF point display during focus | Selected (constant) |
| VF Display illumination | ON |
| AF Status in Viewfinder | Outside field of view |
| AF Micro-adjustment | ON |
Playback (Blue)
#1
| Menu Item | Value |
|---|---|
| Protect Images | |
| Rotate Images | |
| Erase Images | |
| Image Copy |
#2
| Menu Item | Value |
|---|---|
| RAW Image processing | |
| Resize | |
| Rating | |
| Slide Show | |
| Image transfer | |
| Image jump with wheel | 10 |
#3
| Menu Item | Value |
|---|---|
| Highlight alert | Enable |
| AF point display | Enable |
| Playback grid | OFF |
| Histogram Display | RGB |
| Movie play count | Rec Time |
| Magnification (apx) | 2x |
| Ctrl over HDMI | Disable |
Set up (Yellow)
#1
| Menu Item | Value |
|---|---|
| Record func + card/folder select |
- Record func | Rec to multiple
- Record/play | 2
- Folder | 100EOS1D File numbering | Continuous File Name | Auto Rotate | computer only Format Card |
#2
| Menu Item | Value |
|---|---|
| Auto Power off | 1 min. |
| LCD Brightness | 4 |
| Date/Time/Zone | |
| Language | English |
| VF Grid display | Enable |
| INFO Button display options | All |
#3
| Menu Item | Value |
|---|---|
| Video System | NTSC |
| Battery info | |
| Sensor Cleaning | Auto |
| Communication settings | |
| GPS Device settings |
#4
| Menu Item | Value |
|---|---|
| Save/load cam settings on card | |
| Custom Shooting Mode (C1–C3) | |
| Clear all camera settings | |
| Copyright information | |
| System Status Display | |
| Firmware version/update | 2.0.8 |
Custom Functions (Orange)
C.Fn.1:Exposure
| Menu Item | Value |
|---|---|
| Exposure level increments | +1/3 |
| ISO Speed setting increments | +1/3 |
| Bracketing auto cancel | ON |
| Bracketing sequence | 0–+ |
| Number of bracketed shots | 5 |
| Spot Meter linked to auto focus point | Active point |
| Safety Shift | Tv/Av |
C.Fn.2:Exposure
| Menu Item | Value |
|---|---|
| Restrict shooting modes | none |
| Restrict metering modes | All |
| Metering used in manual exposure | Specified metering mode |
| Set Shutter speed range | 30"–8000 |
| Set Aperture range | 1–32 |
| AE Micro-adjustment | OFF |
| FE Micro-adjustment | OFF |
C.Fn.3:Drive
| Menu Item | Value |
|---|---|
| Continuous shooting speed |
- High Speed (H) | 12 shots/s
- Low Speed (L) | 3 shots/s Limit continuous shot count | Disable Restrict Drive modes | No H14 | (14 fps not available in RAW)
C.Fn.4:Disp/Operation
| Menu Item | Value |
|---|---|
| Focusing Screen | Standard |
| Viewfinder info during exposure | ON |
| LCD Panel Illumination during Bulb | OFF |
| Rec card, image size setting | Rear LCD panel |
C.Fn.5:Operation
| Menu Item | Value |
|---|---|
| Dial Direction during Tv/Av | – + |
| Av Setting without lens | OFF |
| Multi function lock | Quick Cntrl. Dial |
| Custom Controls | Shutter butt. half-press Metering start |
| Key/mic button function | Rec. memo |
C.Fn.6:Others
| Menu Item | Value |
|---|---|
| Add cropping information | OFF |
| Timer duration | 6 sec. |
| Shutter release time lag | Standard |
| Memo audio Quality | 48kHz |
| Default erase option | Cancel (selected) |
| Same expo. for new aperture | OFF |
C.Fn.7:Clear
| Menu Item | Value |
|---|---|
| Clear all custom functions (C.Fn.) |
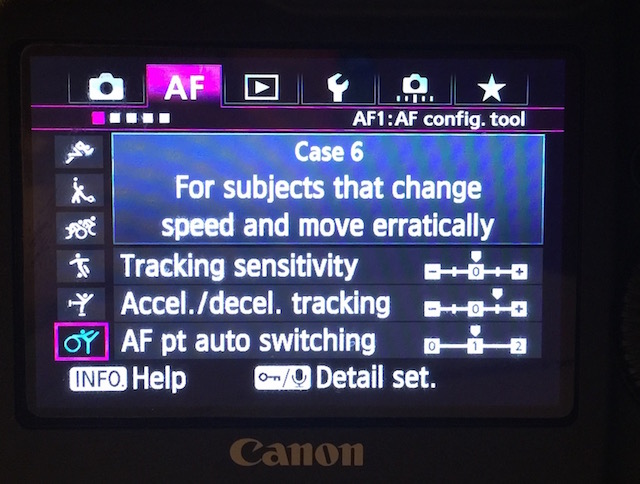
An example of a menu screen (AF No 1)
Setup is a pretty complex procedure. I recommend reading through the manual at least once. Its also likely that you’ll want to test things out, and will probably change your setup over time (and numerous experiments).
Shooting mode explained
-
Shooting mode: I generally set up the camera for Aperture Priority (Av) mode. I also quite often use Manual mode and this is where the custom shooting modes setting come into there own. By applying different shooting functions and assigning them to a custom shooting mode, you can instantly change the shooting parameters (see below).
-
ISO Speed: My standard setting is Auto (50-25,600). There are different settings in the custom shooting modes that I use.
-
AF Mode and rear focus: This may be one of the most critical settings on the camera. The focusing can be made easier and more versatile by setting up “rear focus”. I frequently have the AF set to AI Servo which is the standard setting for focusing on moving subjects. In other words the focus will set on whatever the active focus point is covering. The camera’s default setting for AI Servo is to start focusing as soon as you half press the shutter button and then it will follow focus on whatever the active focus point is covering, whereas in One-Shot AF Mode the focus will lock on the subject that you initially focused on if you keep your finger on the shutter button (half way down). Normally this would necessitate swapping between the two modes depending on your subject movement and the need to lock focus in some circumstances. Setting up “rear focus” makes all this much easier.
Go to Custom Function C.Fn.5 (Operation) – “Custom Controls” and change the setting for the shutter button to Metering Start only. Then set up the AF-ON button for AE lock (locks exposure while held down) and the
*button for Metering and AF Start. In effect you have swapped the functions of the AF-ON Button and the*button and disabled the shutter button for initiating focus. I find my thumb automatically goes to the*button rather than the more distant AF-ON button. The AF-ON button is even further from the right top edge of the 1D X camera body than the previous 1D Series bodies. It is however, a little more difficult when shooting in the vertical format as the vertical format control buttons are much closer together. Now when you press and hold the*button, AI Servo AF Mode operates (because you have set AI Servo as your standard setting). If you now lift your thumb from the*button – focus is locked at the last focused object. You can then recompose your image as if you were in one-shot AF mode and held the shutter button halfway down and recomposed your image. No need to swap between AI Servo and one-shot Mode anymore. Always keep your thumb on the*button and if you want to lock focus, lift it. The shutter button will set the exposure and initiate the image stabilisation of the lens (if it is an IS lens). I have used the “rear focus”, in fact all the way back to the (original) 1Ds.If I am doing just landscapes, then I may change to one-shot AF Mode, but I still use the
*button to initiate focus.If you find it more intuitive to hit the AF-ON button, then leave the function for this and the
*button at the default setting, but still change the shutter button to Metering start only. Right-eye shooters may prefer this as you don’t have so much of your face (nose) near the control buttons.See later for “Assignable Functions to Camera Controls”
-
Metering Mode: I almost always use Evaluative Metering. There are some times when I want to use Spot however, so I do leave all modes enabled. (C.Fn.2 – restrict metering modes)
-
ISO Speed: Standard setting Auto. Can easily change using top right-hand button and control wheel. To make it simpler the ISO Speed Range is “restricted” to 50-204,800 and auto ISO (if needed) to 100-25,600. I say restricted, but really, that’s the widest range possible. Expansion on the low end gives me 50, and expansion on the upper end gives me both 102,400, and 204,800. Remember if you have Highlight Tone Priority set then the minimum ISO can only be 200.
-
Highlight Tone Priority: Have set this to OFF. However, it is part of “My Menu Settings” (see later) so that it can be enabled quickly. I could choose to use it if/when there is a prevalence of lighter colors.
-
Mirror Lock-up: This is disabled but forms part of “My Menu Settings”.
-
Live View Set: On the 1D X there is now a live view button (placed on top left, right back-edge, nearest the viewfinder). The setting (under Shooting menu 4) is set to “stills”. Pushing the LV button lifts the mirror and enables live view for still photography. If movies need to be shot then a menu change hass to be done. May put this in “My Menu Settings”, but will have to delete an existing option in there.
AF Functions (Menu #2)
Before moving on to the settings underneath AF Menu #2, I want to briefly outline the AF Area Selection Mode1. This can be set to Single-point Spot AF, Single-point AF, AF point expansion with 4 surrounding points, AF point expansion with 8 surrounding points, Zone AF, and 61-point automatic selection AF Modes. The lens you use will also have an impact on how the AF system works. Of the 61 point AF points, 5 points are dual cross-type, 36 additional points are cross-type focusing and a further 20 points are vertical focusing. The behaviour of these points and the total number of available points depend on the lens’s maximum aperture and lens type. It largely depends on whether the maximum (widest) aperture is f2.8 or larger, f/4, f/5.6 or smaller. The maximum aperture also includes tele-converters. For example, if we take an f/5.6 lens, like the Canon EF 100-400mm f/4.5-5.6L lens with a 1.4x TC would have an effective maximum aperture of f/8. The camera is unable to autofocus with a lens (or combination of lens and TC) with a maximum aperture which is smaller than f/8. This means that you could not use a combination of the EF 100-400 f/4.5-5.6L lens, a 1.4x TC, and a 2.0x TC because the maximum aperture would be f/10.
The settings below mostly refer to the AI Servo AF mode
-
AI Servo Characteristics2: This collection of settings determines how the AF will track a moving subject. There are six presets, each with default settings for the three parameters which determine the AF behaviour depending on the subjects’ movements.
Case 1 is for versatile multi-purpose shooting
Case 2 will continue to focus-track even when the subject momentarily moves from the selected AF point(s)
Case 3 will focus instantly on subjects that move into the AF point(s)
Case 4 will track subjects that accelerate or decelerate quickly
Case 5 will focus on subjects with erratic movement
Case 6 will focus on subjects with erratic movement and changes in speed.
Each of these case can be changed in regard to sensitivity for three parameters – tracking sensitivity, acceleration/deceleration tracking, and AF point auto switching. This means that for any of the above cases, above you can change any of the three parameters. For example, if you are photographing a subject that is moving at a fairly constant speed across a varied or “busy” background and you need to ensure that the focus does not shift from the subject to the background if the focus point moves off that subject briefly, then you can use Case 2, but increase the parameter setting for Tracking sensitivity from the default of -1 to -2. It should be noted that these settings cannot be included in custom shooting modes, if you want quick or easy access to them, you should include them in your “My Settings Menu”.
-
AI Servo 1st and 2nd Image Priority: I set this to focus priority. Its argued that it slows the initial frame rate in High Speed Mode but the camera will try to achieve focus before activating the shutter. If you are less concerned about the focus, and more about getting the shot, you can set this to Speed.
-
Auto AF point selection, :EOS iTR AF: If the 61-point automatic selection or Zone AF is selected, focusing will take place using the subject’s color or face detection. In AI Servo AF Mode the color of the area where initial focus was achieved is used to continue the focus. The camera will then track that color across other AF points. It is for this reason that either 61-point Auto or Zone AF must be used as the AF selection mode.
-
AF Area Selection Method: After pushing the AF point selection button, you can cycle through the AF Area Selection Modes using either the control wheel or the M-Fn button. I prefer to use the control wheel. I use the M-Fn button to cycle through the Custom Shooting Modes (see later), but the AF Area Selection Mode cycling is only activated after pushing the AF point selection button.
-
Orientation Linked AF Points: This is a really slick feature if you switch back and forth between horizontal and vertical shooting. For example, lets assume you are using the top middle focusing point, then if this feature is set, when you turn the camera to the vertical position the focus point will be in the middle at the top. Useful if you are focusing on the head of a taller, upright subject and you feel the composition would be better in the vertical format. No need to change the focus point – just turn the camera. This can be set for whichever way the camera is held in the vertical position – grip on the top or grip on the bottom. Set the AF Menu #4 “Orientation linked AF point” to “select separate AF points”.
-
AF Micro-adjustment: This is a pretty involved process which can be read about separately. I do micro-adjustment for all my lenses using Lens Align®. This is pretty critical for any lenses where depth of focus can be very small.
Custom Functions
The table above shows all the camera’s current settings. Comment is necessary regarding C. Fn.5 Operation – Custom Controls
There are 11 buttons (camera controls) that can be assigned specific functions: My set up is as follows:
| Button | Assigned function |
|---|---|
| Shutter Button | Metering Start |
| AF-ON | AE Lock |
* |
Metering and AF start |
| DOF Preview | Switch to Registered AF Point |
| Lens Button (super-teles) | Unassigned |
| M-Fn | Cycle custom shooting modes |
| M-Fn2 | Toggle between Single shot, and AI Servo AF |
| SET | Magnify/Reduce Playback |
| Main Wheel | Shutter Speed setting in M Mode |
| Quick Control Dial | Aperture setting in M mode |
| Multi-Controller | AF Point direct selection |
As explained under AF Mode and rear focus above, the
function of the * and AF-On buttons have been reversed and the shutter
button activates metering only. The other functions assigned should be self
evident. As there is no button assigned to VF level, I have set the info button
to show VF level when pushed. I don’t need shooting data to display because I
see that in the viewfinder already. That can be done in
Set-Up Menu 2 – “INFO button display options”.
Custom Shooting Modes
One of the best features of the 1D X is the ability to have three custom shooting modes and being able to quickly cycle through them.
I have set up three shooting modes, one for portrait shooting, one for sports (action shooting) and one for landscapes. In each of these I have set up the shooting mode, menu settings, Custom Function settings and other current camera settings to the C1>C2>C3 Custom Shooting Modes. You can enable these modes in C.Fn.2 (restrict shooting modes) by ticking all of them. My portrait setting would be Aperture priority, starting aperture – f/1.0 (wide open for what ever lens you put on), Auto ISO, Single shot AF, appropriate Custom Functions and AF settings. For sports shooting, my starting ISO setting is still auto, the shooting mode is Manual, the starting aperture is again f/1.0 and shutter speed of 1/2000 sec. If the exposure needs adjustment, it is easy to do with the main dial or control wheel. The AF configuration tool is set to whatever “case” is appropriate. I use Case 1 for portrait, Case 6 for sports/action, and for landscapes, Case 2. For Landscapes, the starting aperture is f/11, shooting mode is Aperture priority and ISO 100. Here I use One-shot focusing mode. The M-Fn button is set to cycle through C1>C2>C3. If you need to change altogether you can hit the Mode button (top left front) and using the main dial to select a shooting mode, like shutter priority. All the other settings that were in the last used custom function will apply. Use this feature carefully as you can get confused with the settings.
An alternative option is also to save all your camera settings to a file on a compact flash card (How you juggle wiping cards, writing to multiple cards, etc is up for debate and may impact your decision to use this as a daily option. I do think it makes a great option to make a backup of your settings). When this file is loaded by the camera, the respective saved camera settings will be applied. This takes quite a few more button pushes, but if your files are easily identified then this is a good way to register settings as all the camera settings can change, whereas with the above Custom Shooting Settings (C1>C2>C3) some can’t be changed.
My Menu Settings
Under “My Menu” Tab in the menu, you can also register up to six menu options and Custom Functions whose settings you may often change. It is then easy to change the tracking sensitivity, the acceleration/deceleration tracking or the AF point auto-switching settings. I also have Mirror lock-up, Highlight Tone Priority and Lens Drive when AF Impossible included. As I work more with the camera, these settings will be refined.
In Summary
As you can see from this writeup, and reading the manual, the set up is complex. I am sure that the more you use the camera, the more the configuration will be refined and you may find some other shortcuts.
In short, I have been using the camera for about eight weeks and I think it is amazing. The image quality, high ISO quality, Autofocus and ergonomics are exactly what you would expect from a top of the line camera body. As with the 1Ds and the 1Ds Mark II, its the best I have ever experienced with a Canon body. The downsides are weight and the inability to autofocus with a lens and TC combination with an effective maximum aperture of greater than f/8. Fortunately, I don’t currently have any lenses that cause me to be limited in this way.
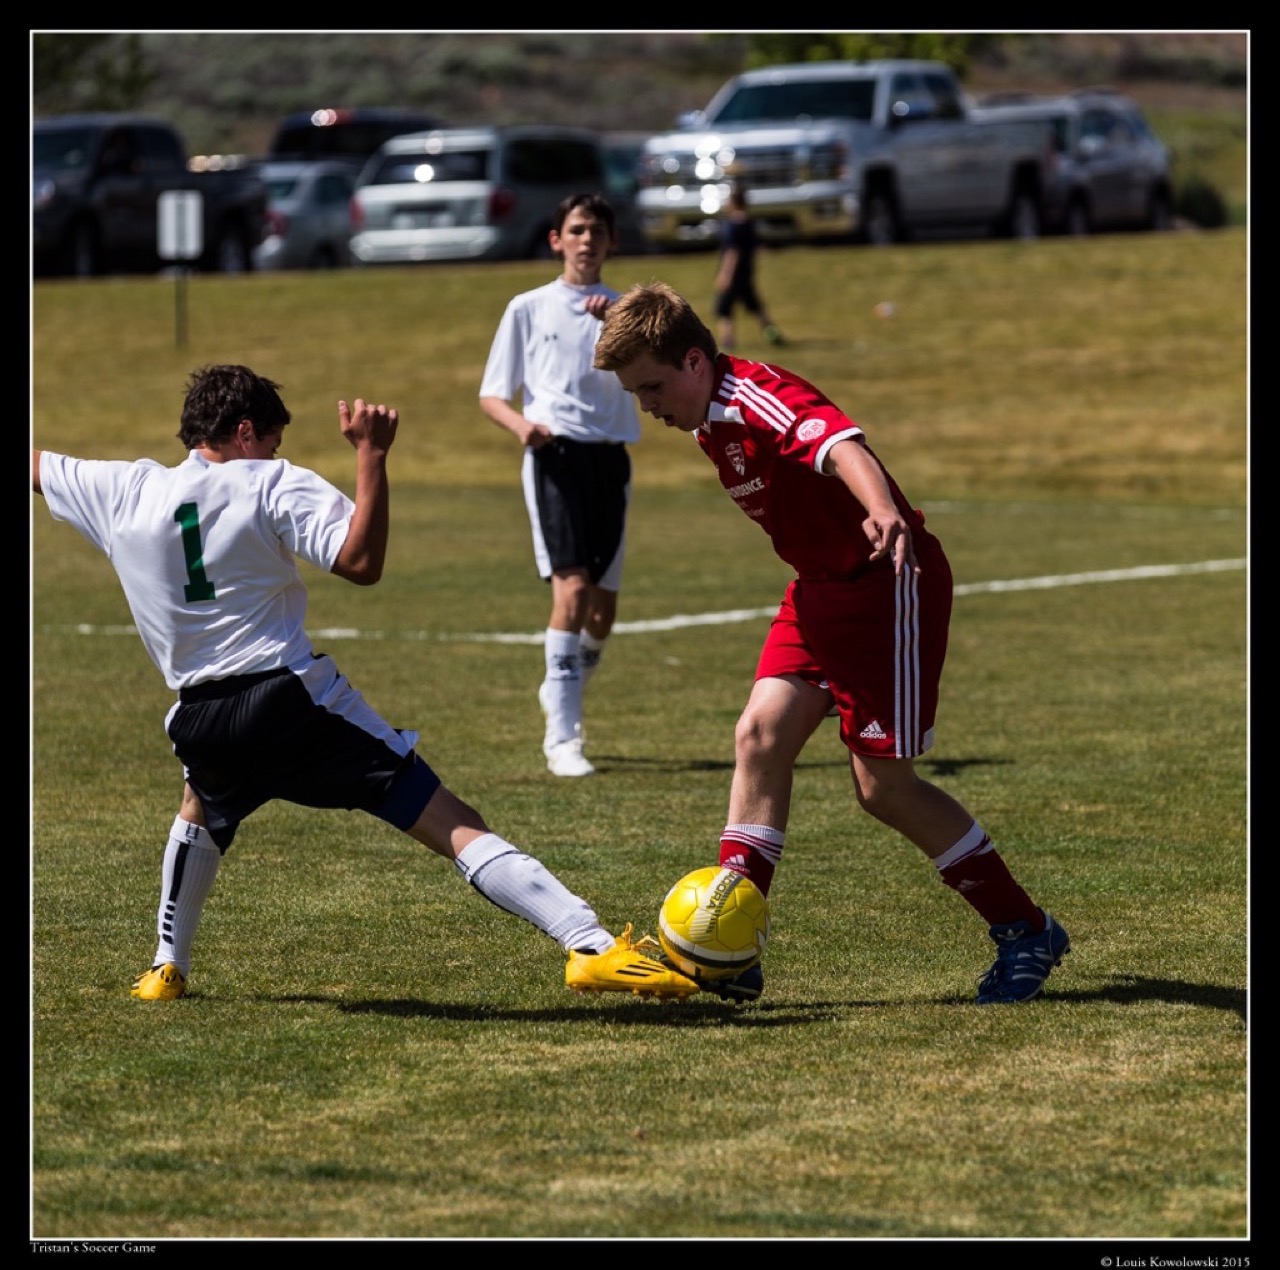
Sample Gallery
This gallery includes various different kinds of shots I’ve taken with the 1D X. Some show tracking movement, others show ISO capabilities (some high, some low).
*[AF]: An autofocus (or AF) optical system uses a sensor, a control system and a motor or tunable optical element to focus automatically or on a manually selected point or area. - Wikipedia *[sRGB]: sRGB is a standard RGB color space created cooperatively by HP and Microsoft in 1996 for use on monitors, printers and the Internet. - Wikipedia *[USM]: An ultrasonic motor is a type of electric motor powered by the ultrasonic vibration of a component, the stator, placed against another component, the rotor or slider depending on the scheme of operation (rotation or linear translation). - Wikipedia *[AWB]: In photography and image processing, color balance is the global adjustment of the intensities of the colors (typically red, green, and blue primary colors). An important goal of this adjustment is to render specific colors – particularly neutral colors – correctly; hence, the general method is sometimes called gray balance, neutral balance, or white balance. - Wikipedia *[LCD]: A liquid-crystal display (LCD) is a flat panel display, electronic visual display, or video display that uses the light modulating properties of liquid crystals. Liquid crystals do not emit light directly. - Wikipedia *[ISO]: Sensitivity of the camera’s sensor to light. Typically, the higher the ISO, the more grainy the image appears. *[CMOS]: Complementary metal–oxide–semiconductor (CMOS) /ˈsiːmɒs/ is a technology for constructing integrated circuits. CMOS technology is used in microprocessors, microcontrollers, static RAM, and other digital logic circuits. CMOS technology is also used for several analog circuits such as image sensors (CMOS sensor), data converters, and highly integrated transceivers for many types of communication. In 1963, while working for Fairchild Semiconductor, Frank Wanlass patented CMOS (US patent 3,356,858). - Wikipedia *[JPEG]: In computing, JPEG (seen most often with the .jpg or .jpeg filename extension) is a commonly used method of lossy compression for digital images, particularly for those images produced by digital photography. *[VF]: In photography, a viewfinder is what the photographer looks through to compose, and in many cases to focus, the picture. Most viewfinders are separate, and suffer parallax, while the single-lens reflex camera lets the viewfinder use the main optical system. - Wikipedia *[HDMI]: HDMI (High-Definition Multimedia Interface) is a proprietary audio/video interface for transferring uncompressed video data and compressed or uncompressed digital audio data from an HDMI-compliant source device, such as a display controller, to a compatible computer monitor, video projector, digital television, or digital audio device. HDMI is a digital replacement for analog video standards. - Wikipedia *[AE]: A camera in automatic exposure (abbreviation: AE) mode automatically calculates and adjusts exposure settings to match (as closely as possible) the subject’s mid-tone to the mid-tone of the photograph. For most cameras this means using an on-board TTL exposure meter. - Wikipedia *[GPS]:The Global Positioning System (GPS) is a space-based navigation system that provides location and time information in all weather conditions, anywhere on or near the earth where there is an unobstructed line of sight to four or more GPS satellites. - Wikipedia *[AI Servo]: AI servo is an auto focus mode found on Canon SLR cameras, although the same principle is used with Nikon and some Pentax cameras, known there as “continuous focus” (AF-C). - Wikipedia *[Evaluative Metering]: This mode is also called matrix, evaluative, honeycomb, segment metering, or esp (electro selective pattern) metering on some cameras. This metering mode was first introduced by the Nikon FA, where it was called Automatic Multi-Pattern metering. On a number of cameras this is the default/standard metering setting. Here the camera measures the light intensity in several points in the scene, and then combines the results to find the settings for the best exposure. How they are combined/calculated deviates from camera to camera. The actual number of zones used varies wildly, from several to over a thousand. However performance should not be concluded on the number of zones alone, or the layout. In general, the most advanced metering is found on single-lens reflex cameras. - Wikipedia *[Live View]: Live preview is a feature that allows a digital camera’s display screen to be used as a viewfinder. This provides a means of previewing framing and other exposure before taking the photograph. In most such cameras, the preview is generated by means of continuously and directly projecting the image formed by the lens onto the main image sensor. This in turn feeds the electronic screen with the live preview image. The electronic screen can be either a liquid crystal display (LCD) or an electronic viewfinder (EVF). - Wikipedia *[LV]: Live preview is a feature that allows a digital camera’s display screen to be used as a viewfinder. This provides a means of previewing framing and other exposure before taking the photograph. In most such cameras, the preview is generated by means of continuously and directly projecting the image formed by the lens onto the main image sensor. This in turn feeds the electronic screen with the live preview image. The electronic screen can be either a liquid crystal display (LCD) or an electronic viewfinder (EVF). - Wikipedia *[DOF]: In optics, particularly as it relates to film and photography, depth of field (DOF), also called focus range or effective focus range, is the distance between the nearest and farthest objects in a scene that appear acceptably sharp in an image. Although a lens can precisely focus at only one distance at a time, the decrease in sharpness is gradual on each side of the focused distance, so that within the DOF, the unsharpness is imperceptible under normal viewing conditions. - Wikipedia